
This will be a rather long series of posts. I am new to HomeSeer specifically and to Home Automation in general. I thought I would post it in General Discussion, but since a lot of it pertains to HS3, I’ll put it here.
PART 1:
I started learning about 70 days ago, installing a trial version of HS2 and quickly migrating to HS3 by the end of January. I felt like it would be a double learning curve to start with the older version. My brother has a great deal of experience with HomeSeer, so I relied upon his help to get me started. Like many users here I have had quite a bit of trouble getting up to speed. These troubles are mostly learning curve, but compounded slightly by the evolution of HS3, mostly the maturation of the Z-Wave plug-in. Like most software development it seems like two steps forward followed by one step back. Overall I give the HS team high marks for their continuing effort as the product is clearly better than the first version I loaded in January.
I have asked many (possibly inane) questions to this board and to my brother, but I am getting closer to understanding the nuances of the HS software and the Z-Wave network. Many thanks to The HomeSeer folks, my brother and many on this board. I have a long way to go, but I am getting there.
The primary goal of diving in was the “geek factor” as I am sure many of you are guilty. I did have some secondary goals of automating some tasks and most especially reducing our energy usage. I was realistic enough to understand that I would spend more on this approach than I would recover in energy savings, but I still wanted to pursue that goal. Last year I had installed a TED5000 with 4 transmitter modules. That was great at providing me a big picture of electric energy usage, but simply was not a granular as I wanted to really chase some of the smaller “vampire” loads.
Since HS3 supported the Brultech GEM through a plug-in from UltraJones, the first move I made was to that device from the TED. It allowed me to see every circuit in the house and make some changes in devices. We reduced our normal consumption by about 300 watts, so that we are at about an average of 650-watts when the house is more or less dormant. While that is still a lot, it is a vast improvement from the ~950 we were consuming before. This has been due to a replacement refrigerator, changes in the servers (HA, CCTV and Media), swaps to LED lighting for the devices that see more or less constant usage at night and isolation of about 100-watts of vampire loads from items that were only in use on occasion. We found that our two LG MiniSplit air conditioners consumed 30-50-watts each, even when they were off in the winter. They both went on Intermatic contactors to shut them down completely, unless it is warm enough for them to be used. Though they are heat pumps, we find that it is frequently too cold to use them for heat. We rely on a natural gas fired boiler hydronic system for heat. More about that in the next installment. There are a few other items that are now controlled by automation based upon time of day or outside temperature that also have dropped our total average consumption.. All totaled we have a net average reduction of 500-600 watts per hour. At about $.10 per KWH that will net a savings of over $500 per year. I’m sure I could have found the loads without the granularity of the Brultech GEM, but it was certainly easier with all of the data to instantly show what and where our consumption was. UltraJones UltraECM3 plug-in is a great value and a bargain at $39.95. The Brultech GEM is available from http://www.brultech.com. The prices vary based upon the configuration and communication methods. I chose wired Ethernet for my installation.
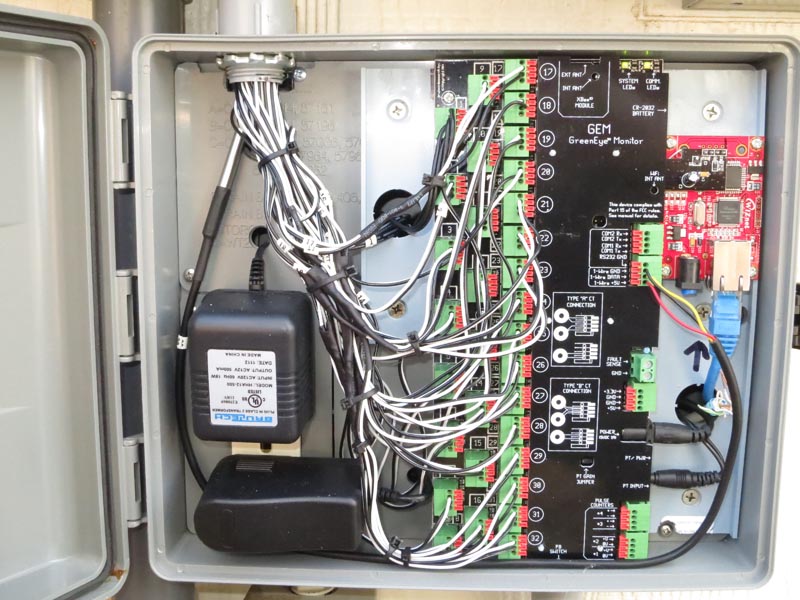
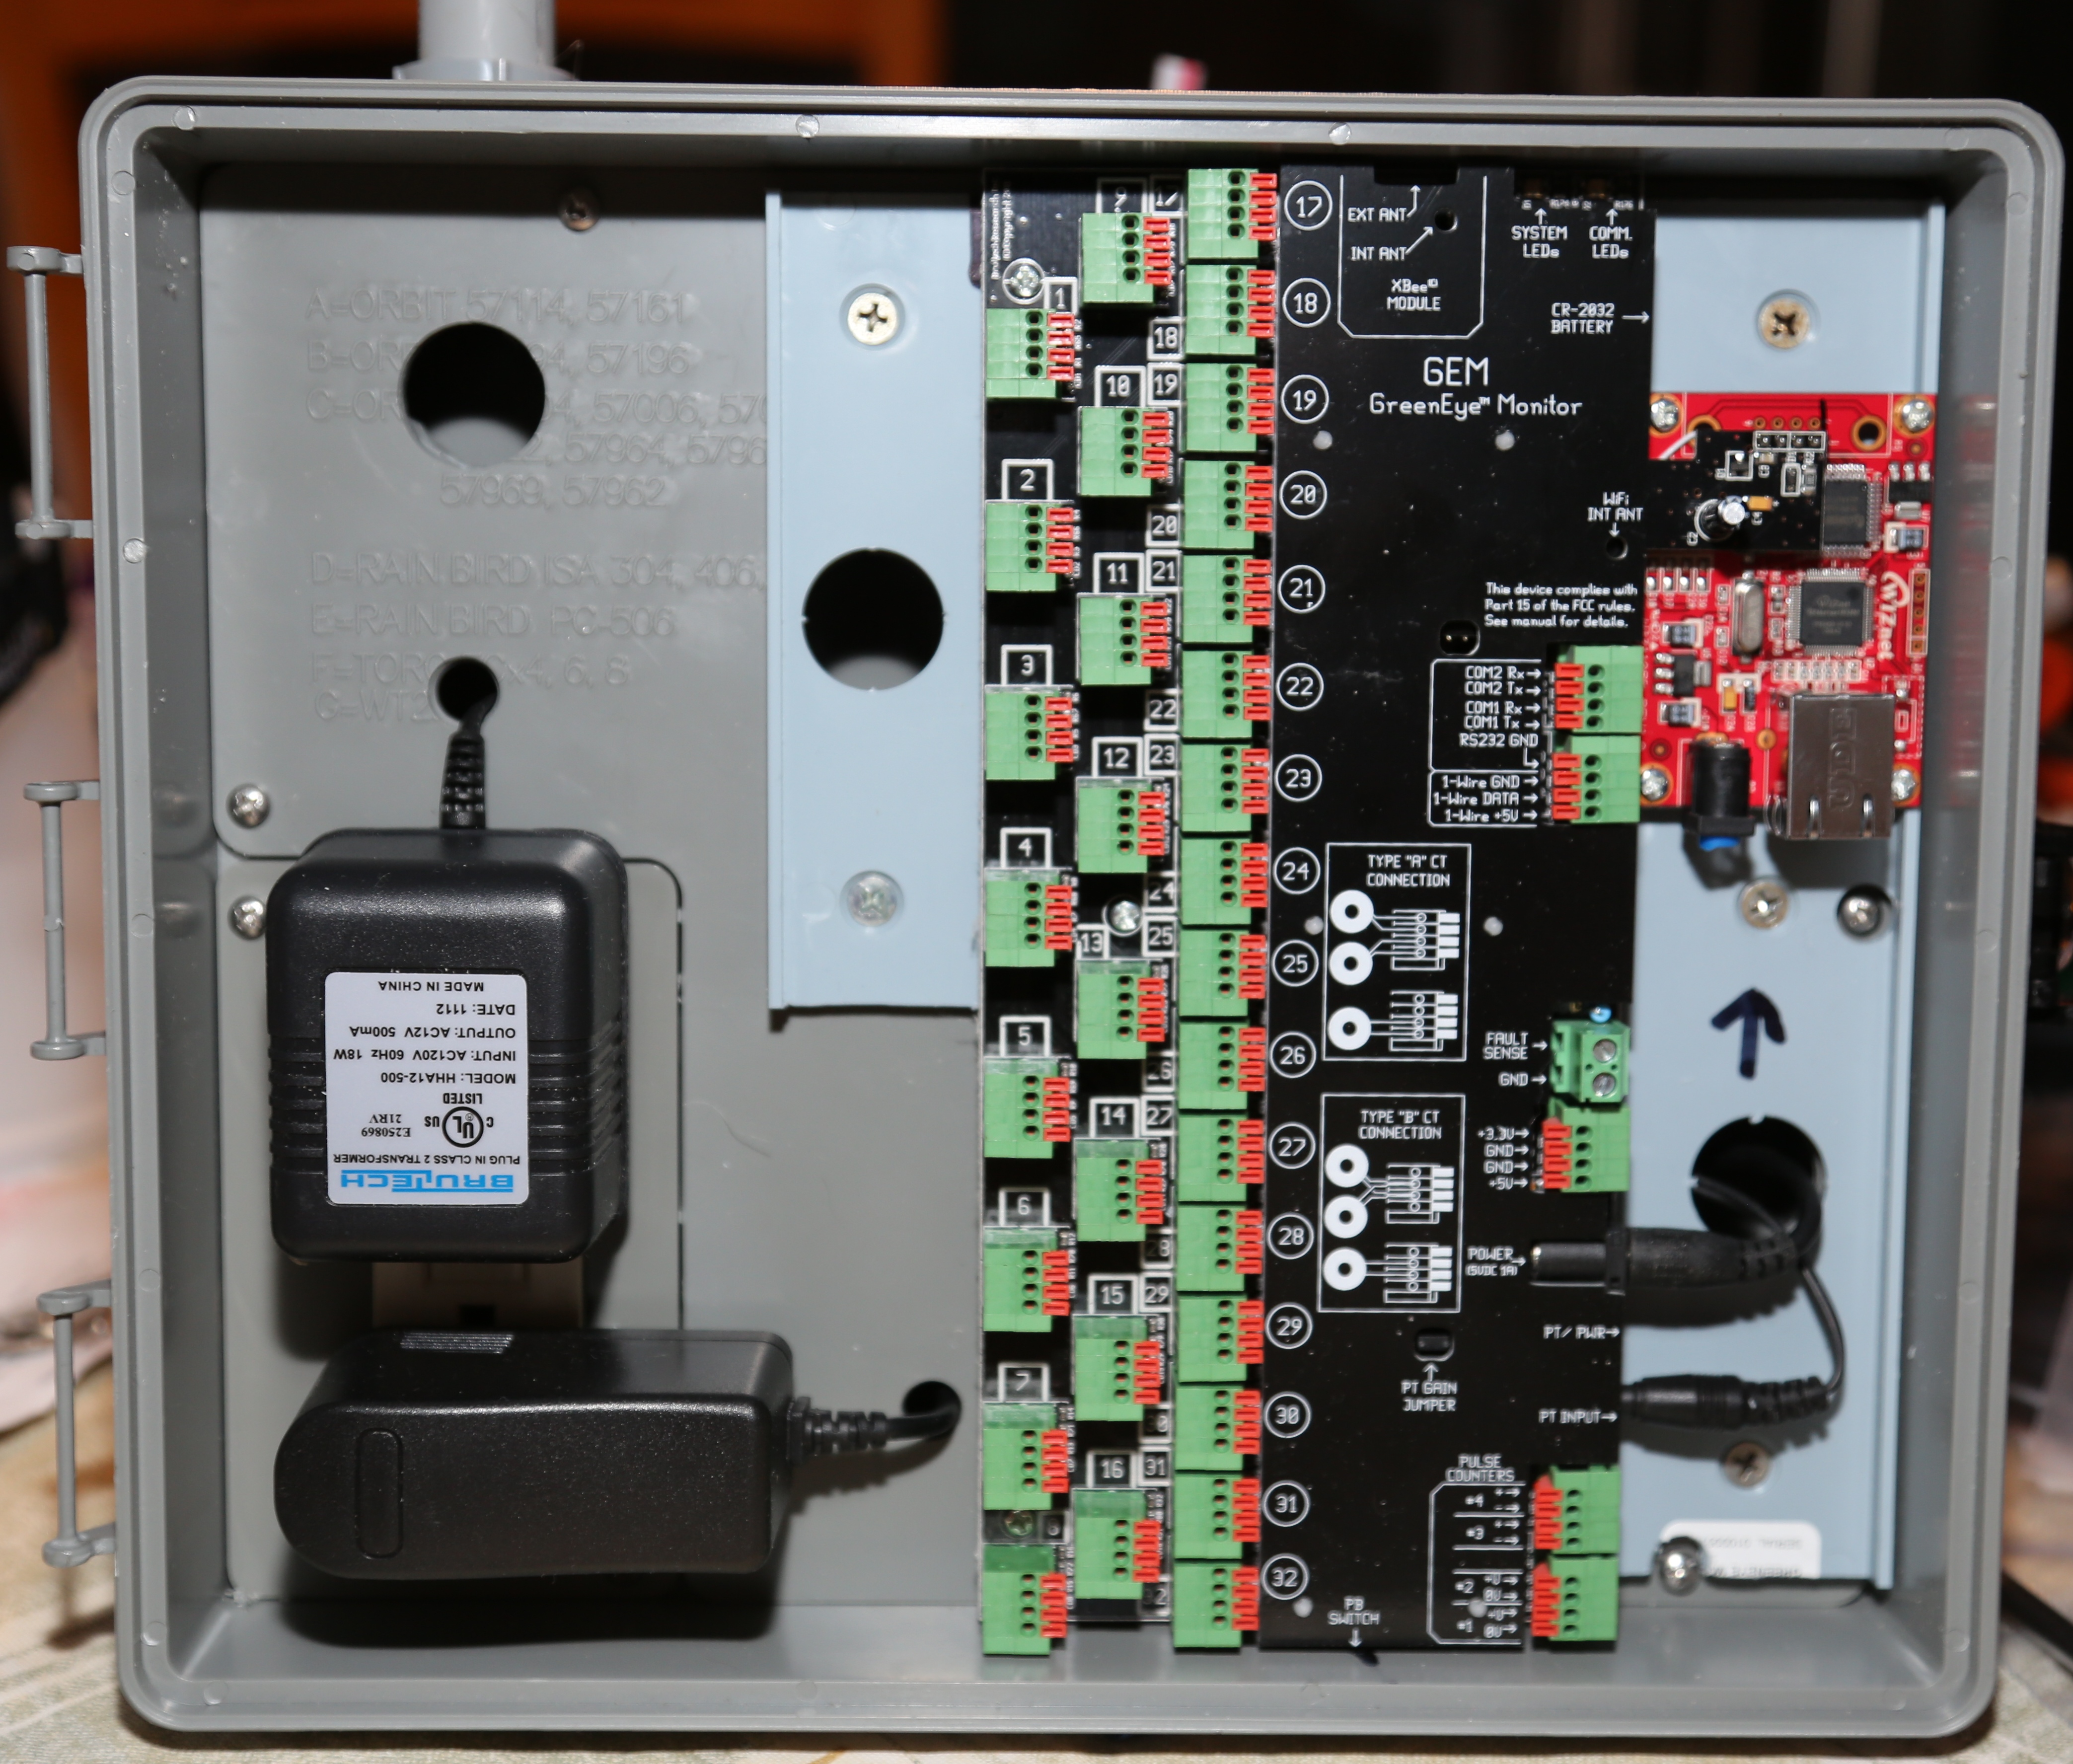
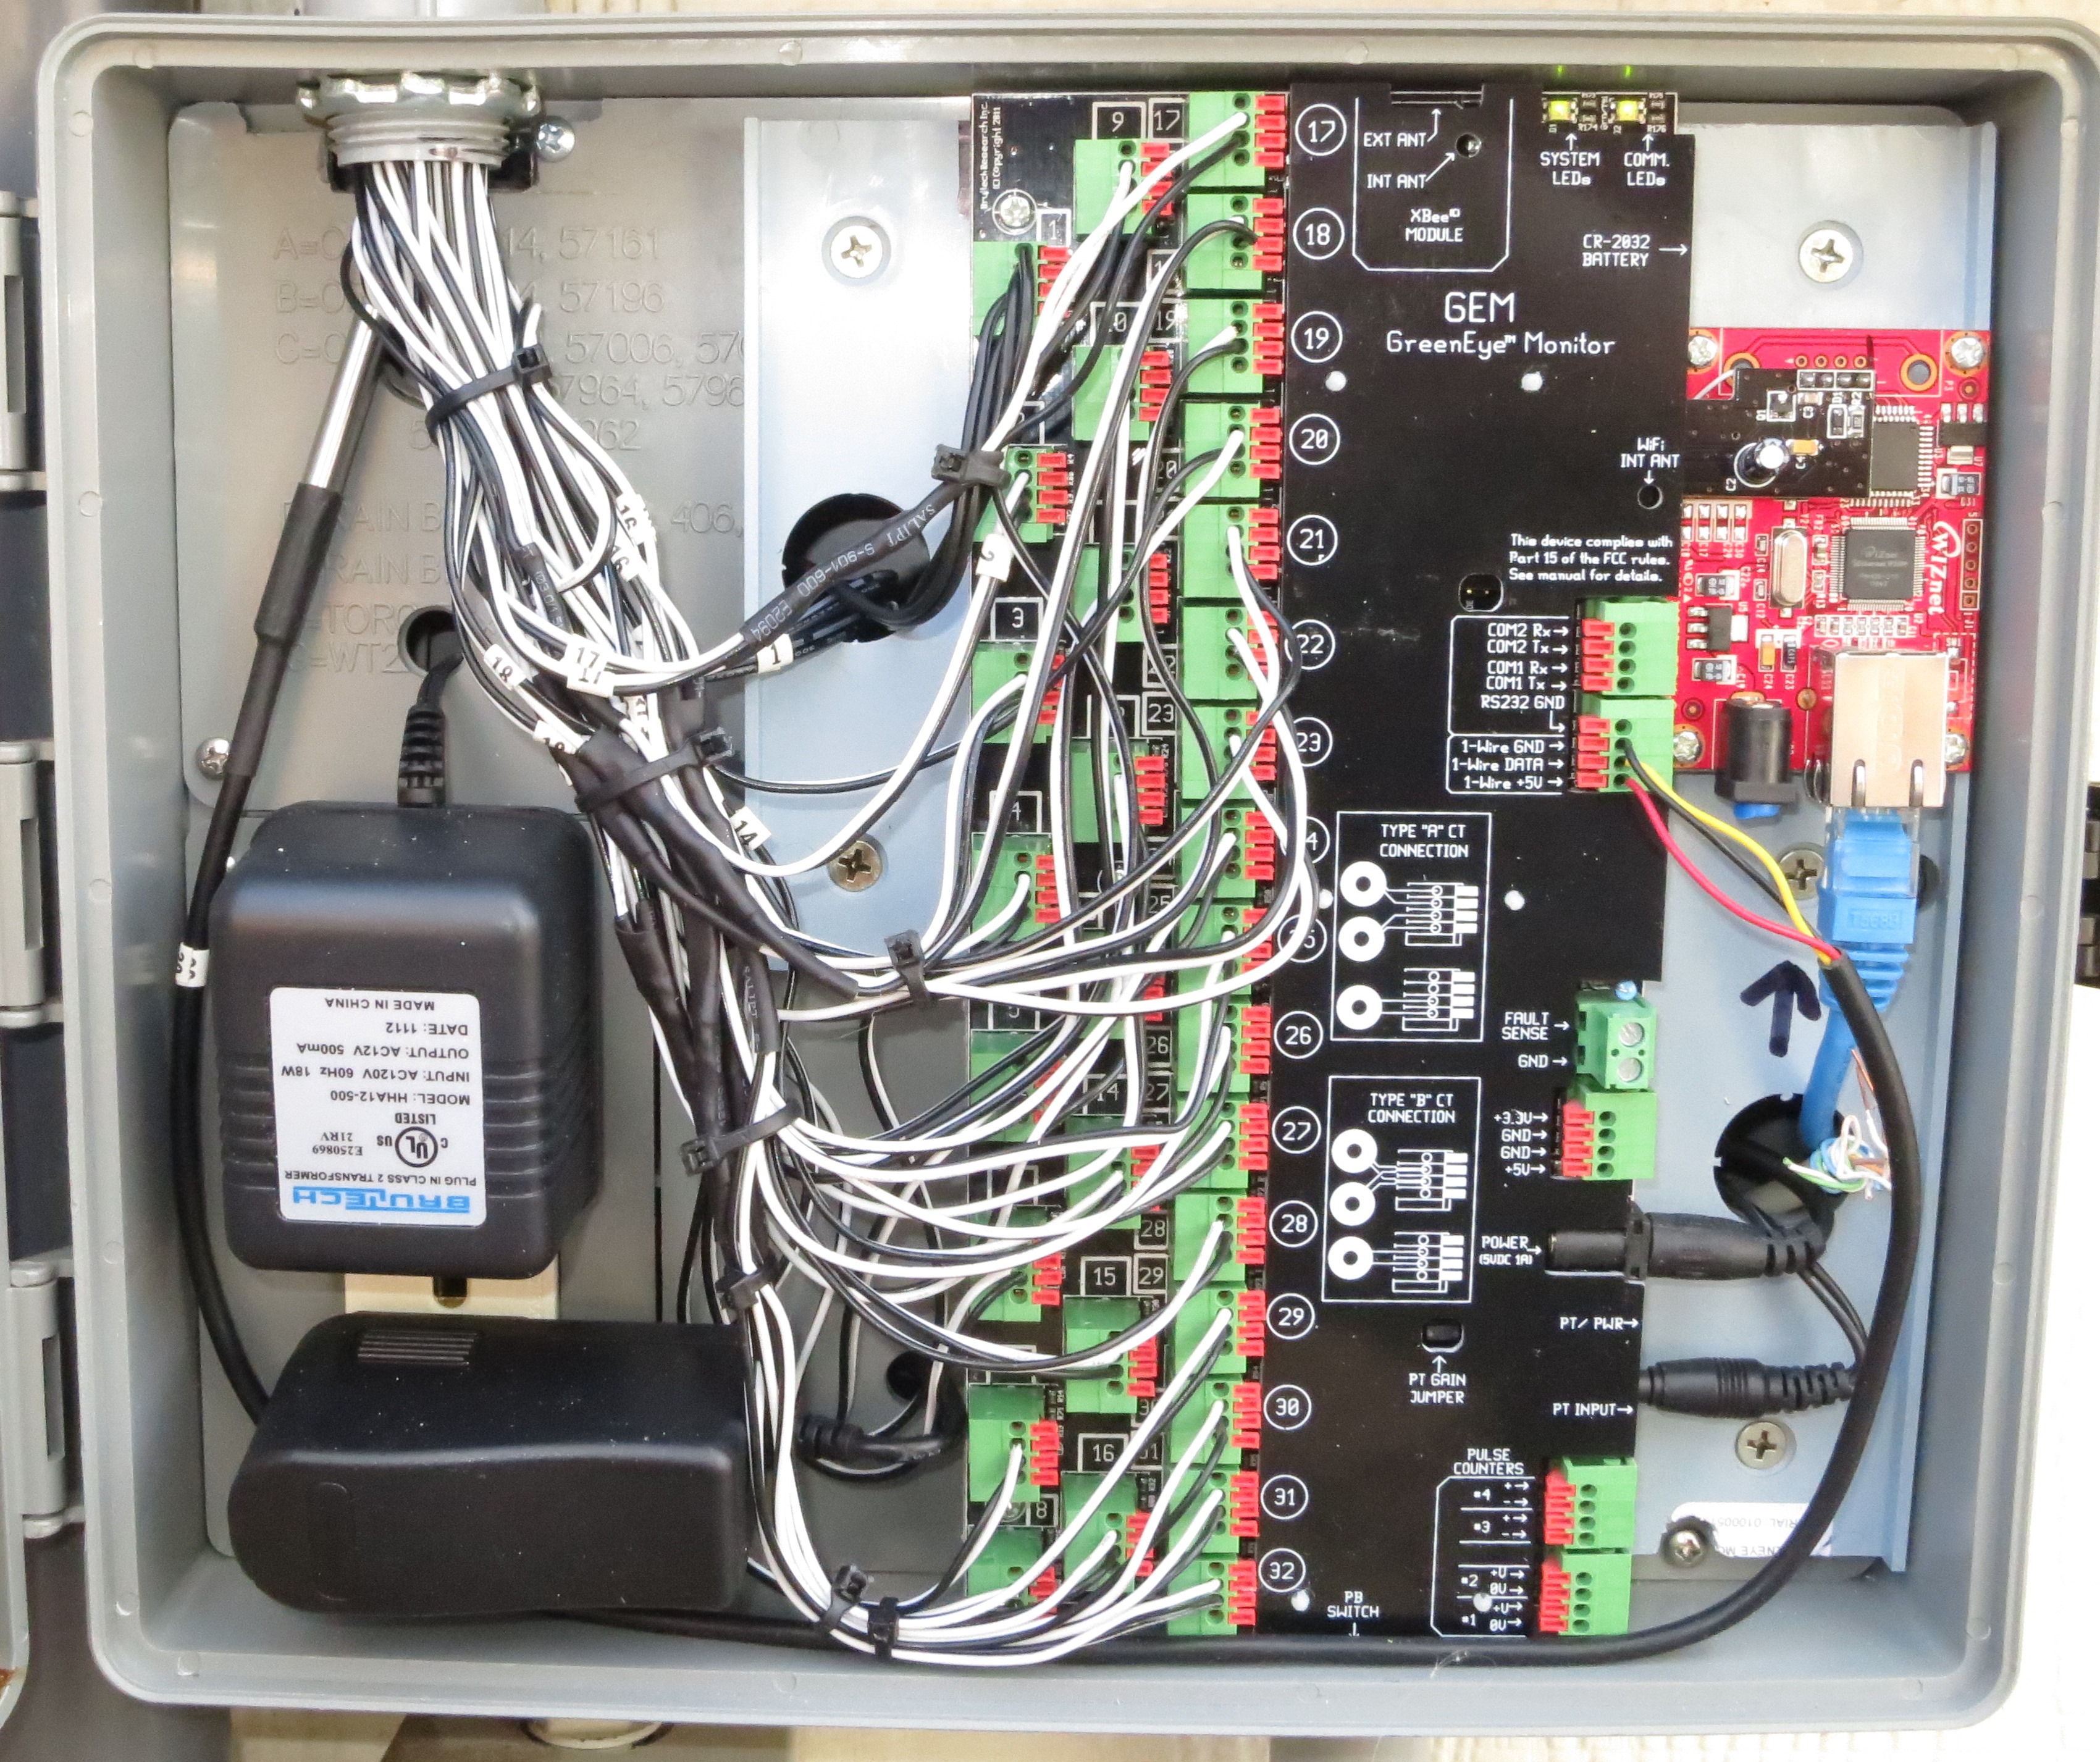
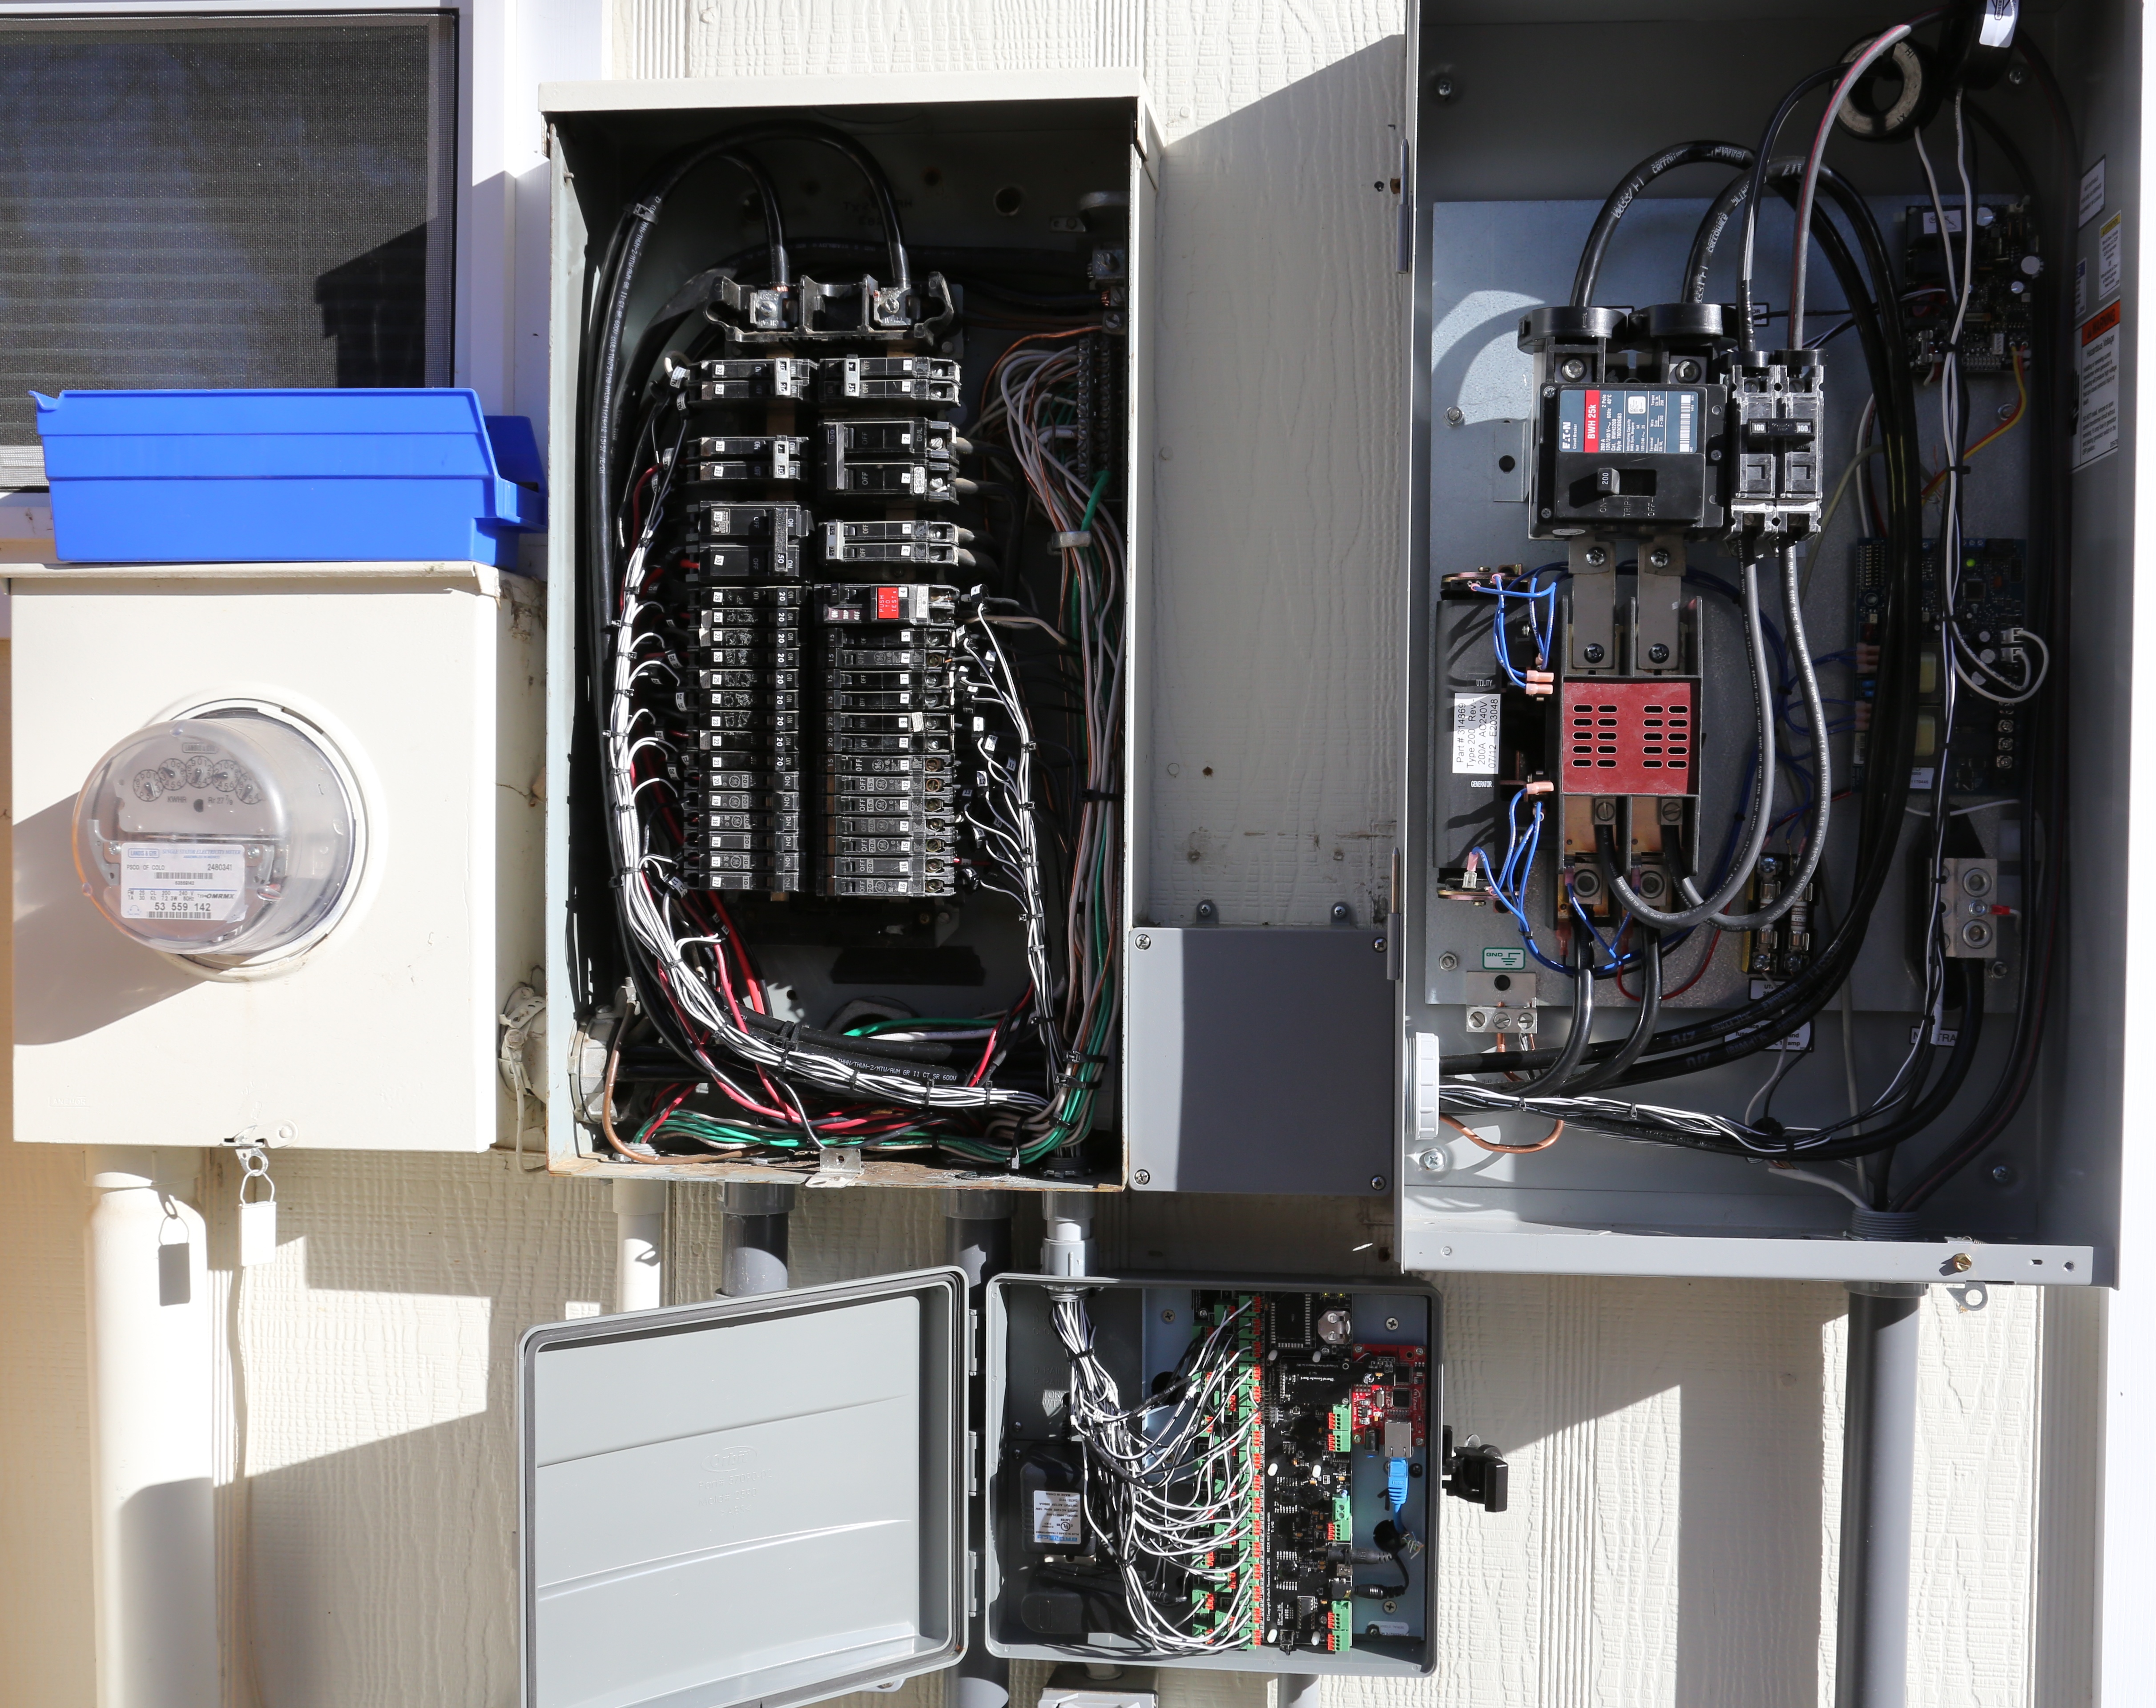
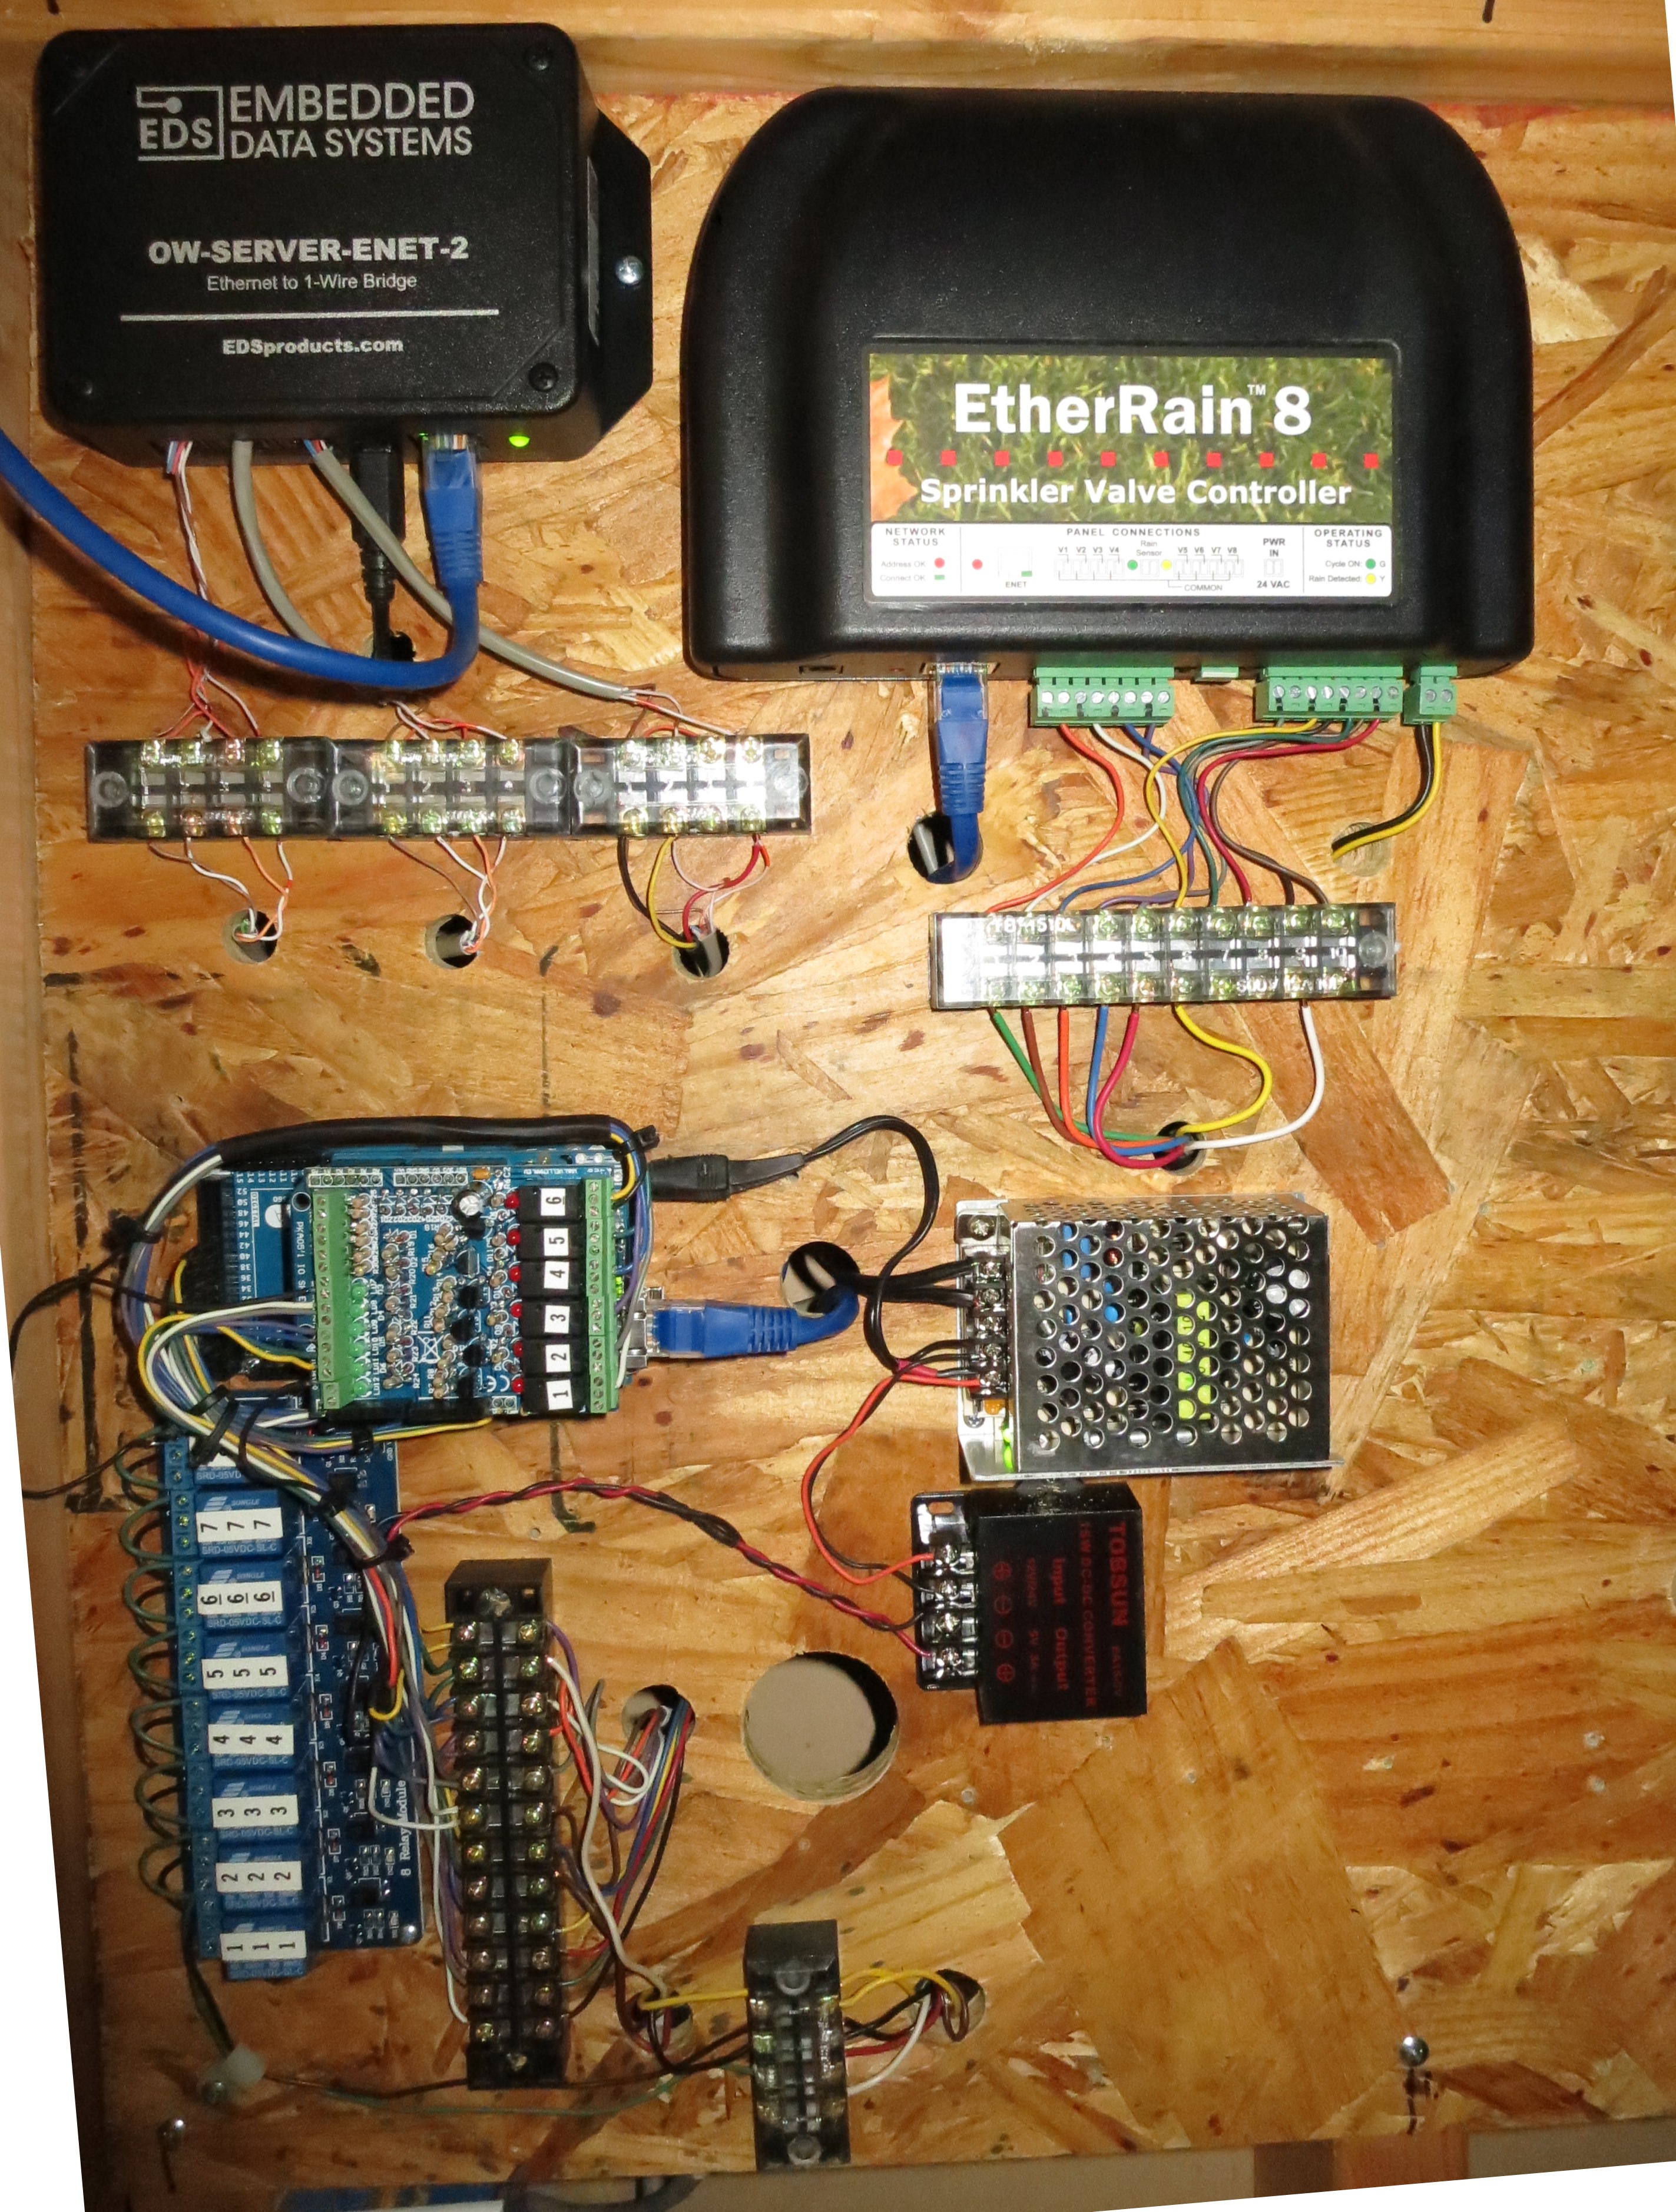
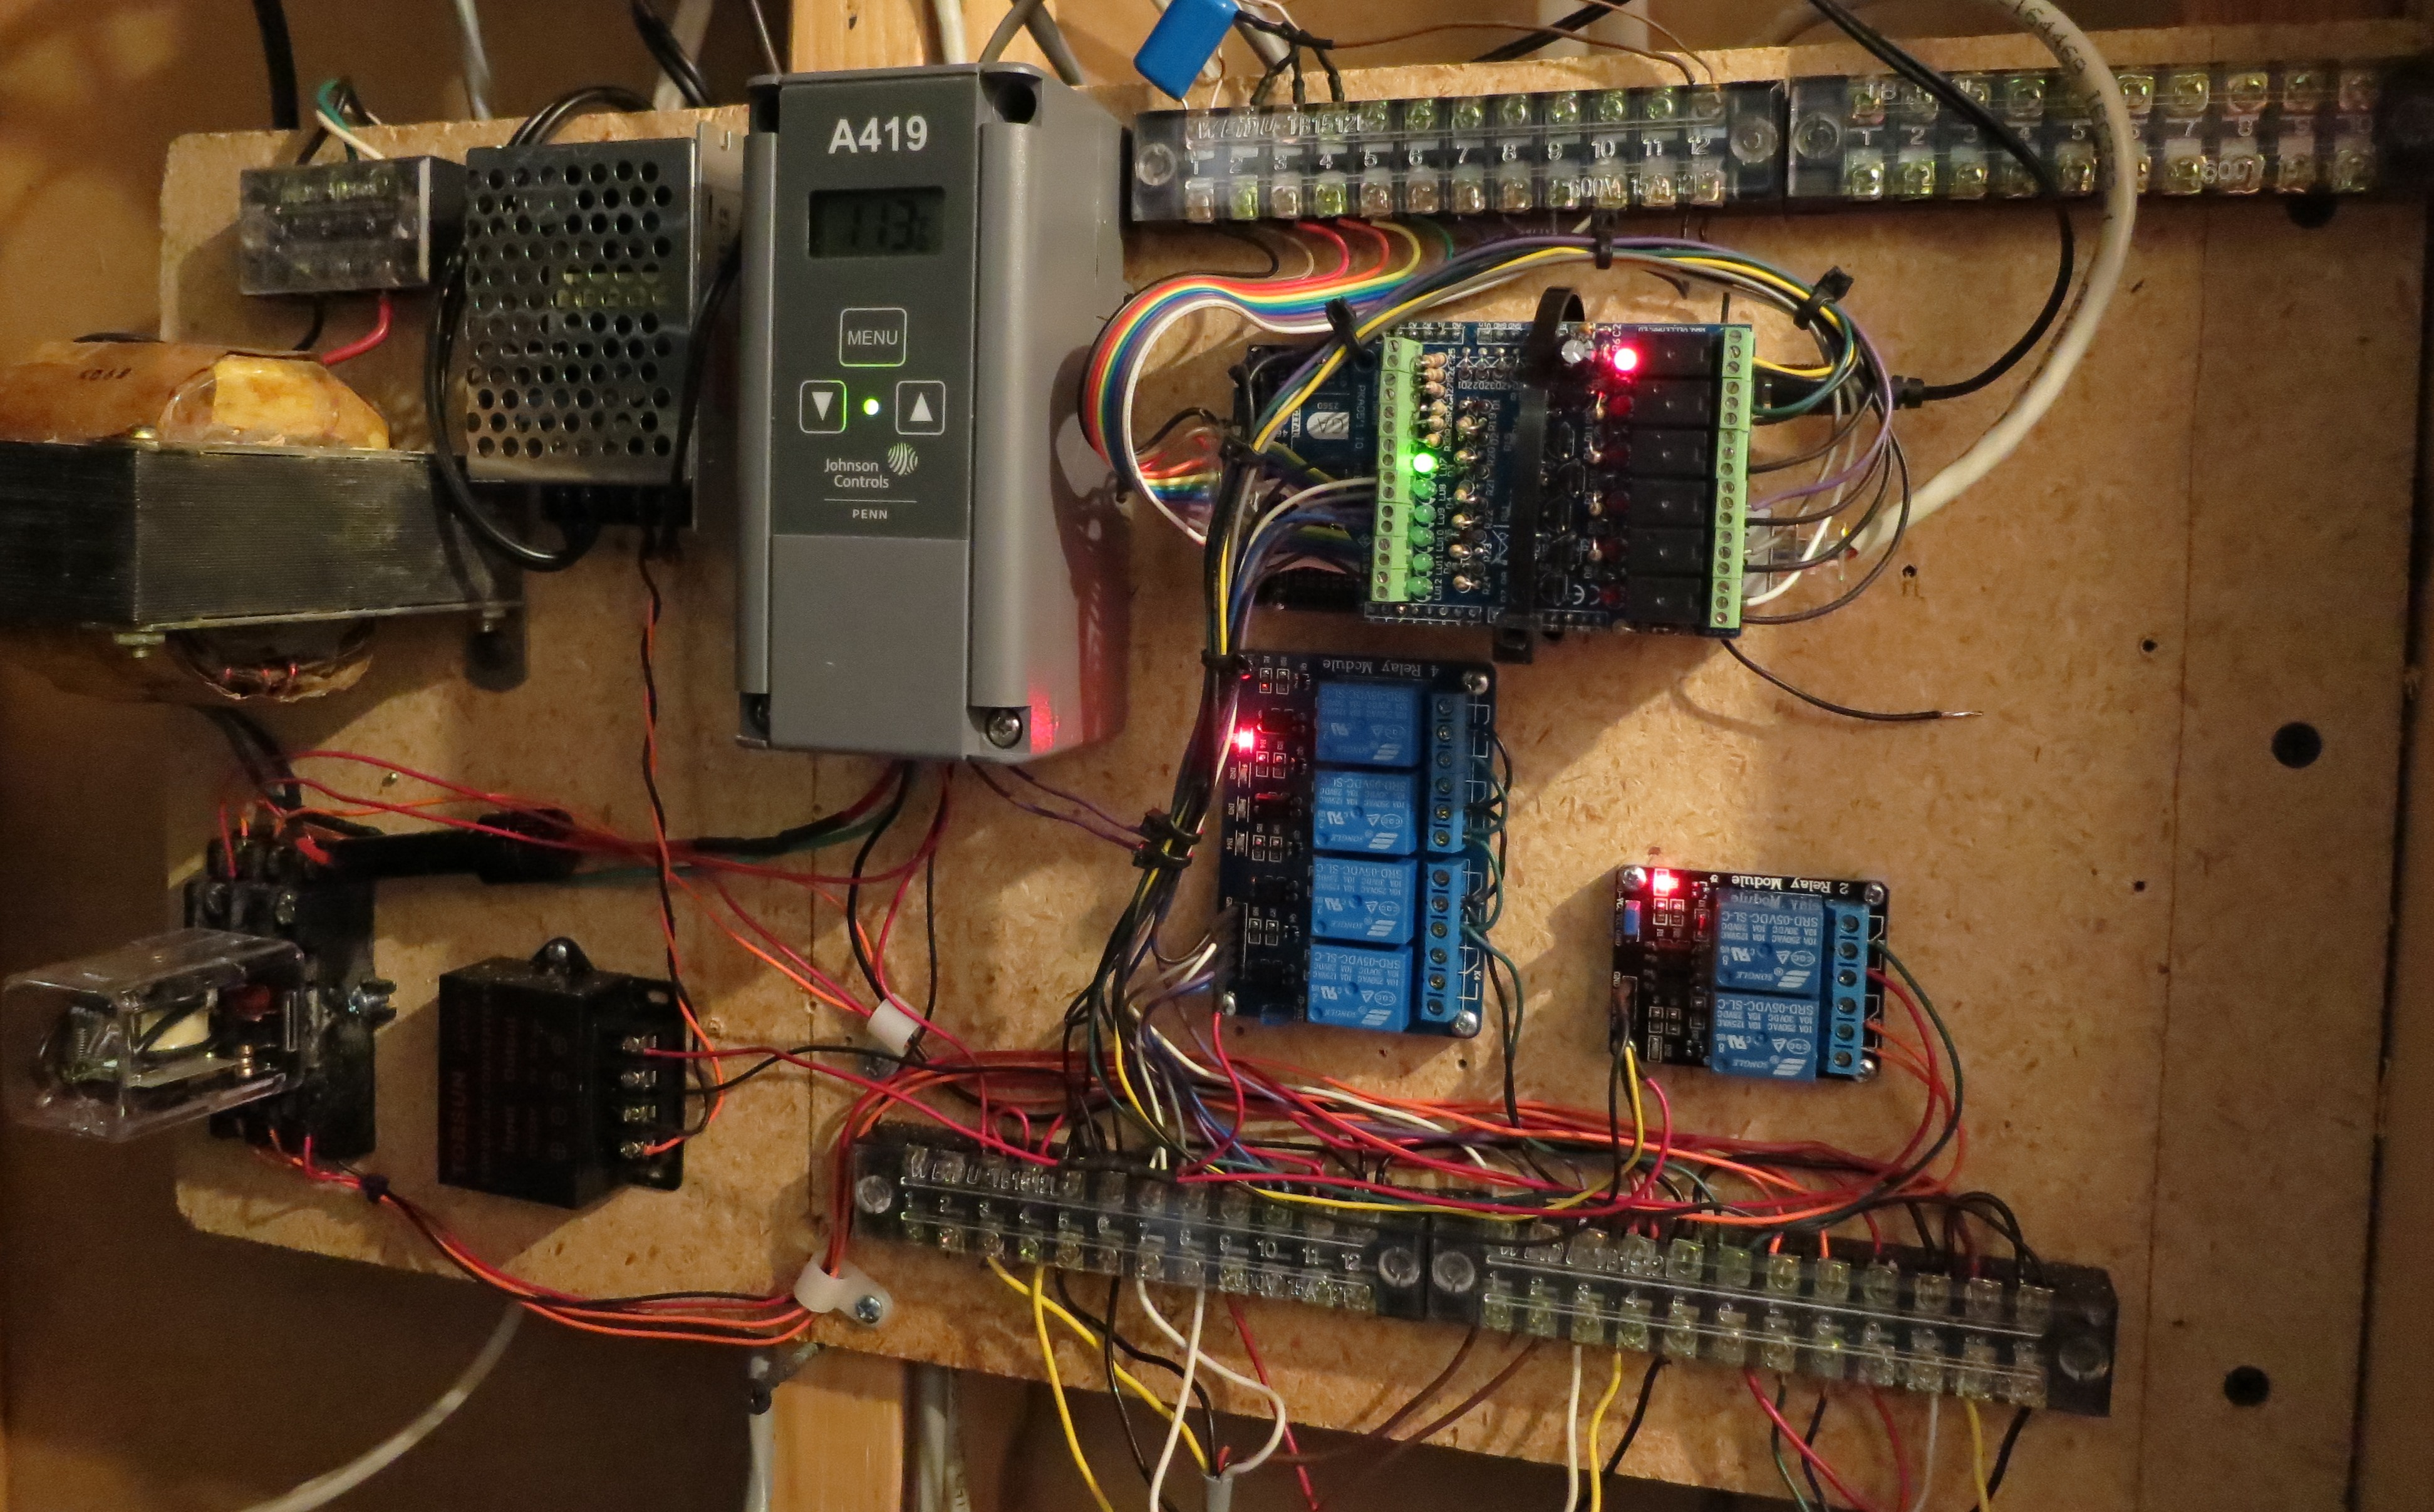
The GEM uses current transformers to measure the load carried by each circuit. Each transformer is inductively coupled to a single lead and converts current into voltage (or current, depending on the style). The output of each CT feeds one of 32 inputs on the GEM. A 120-volt circuit requires 1 CT, a 240-volt circuit with a balanced load can use one CT. If the circuit feeds an unbalanced load such as a sub-panel or devices that may present a different load to one phase of the 240-volt service than the other, two CTs are required. For consistency, I used two CTs for every 240-volt circuit. For these circuits the two CTs are wired out of phase to a single input of the GEM. The Range, Air Conditioners and Dryer are likely to be devices that only present a balanced 240-volt load, so it is unnecessary on these devices. The service entrance, breaker panel and generator transfer switch are all outside on the back of our house. The GEM comes in a case designed for indoor use, so I needed to come up with a solution. One would be to extend the leads on the current transformers by CAT5 cable and locate the GEM indoors. The problem with that is that the service entrance and panels are on the master bedroom wall and below that is a finished basement. That would mean burying the GEM behind a suspended ceiling or very long extensions on all 40 pairs of CT leads. I wasn’t sure how length would affect accuracy, so I elected to mount the GEM outside. I found a nice watertight enclosure to mount the GEM circuit board in. It also had a GFCI protected duplex outlet inside the box. It was not large enough to accommodate the GEM’s full enclosure, but it was large enough to handle the GEM PCB. A little creative trimming of the GEM chassis, made for a perfect fit. All I had to route into the house was Ethernet and a CAT5 cable for possible future use of the 8-device onewire temperature feature of the GEM. The GEM also has pulse counter inputs for potential water or gas consumption measurement. I am not going to use those features at this time.
You can click on any of the images below to see a full-size version.

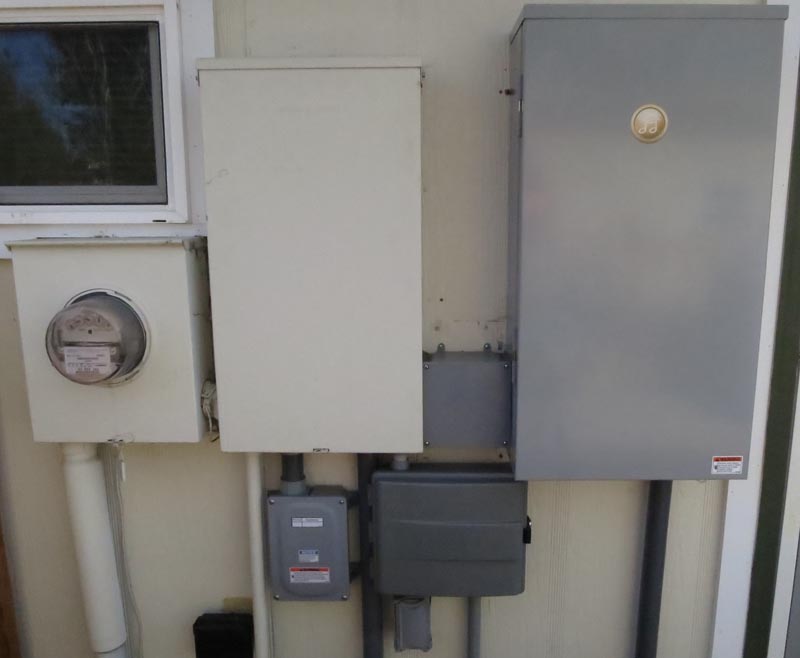
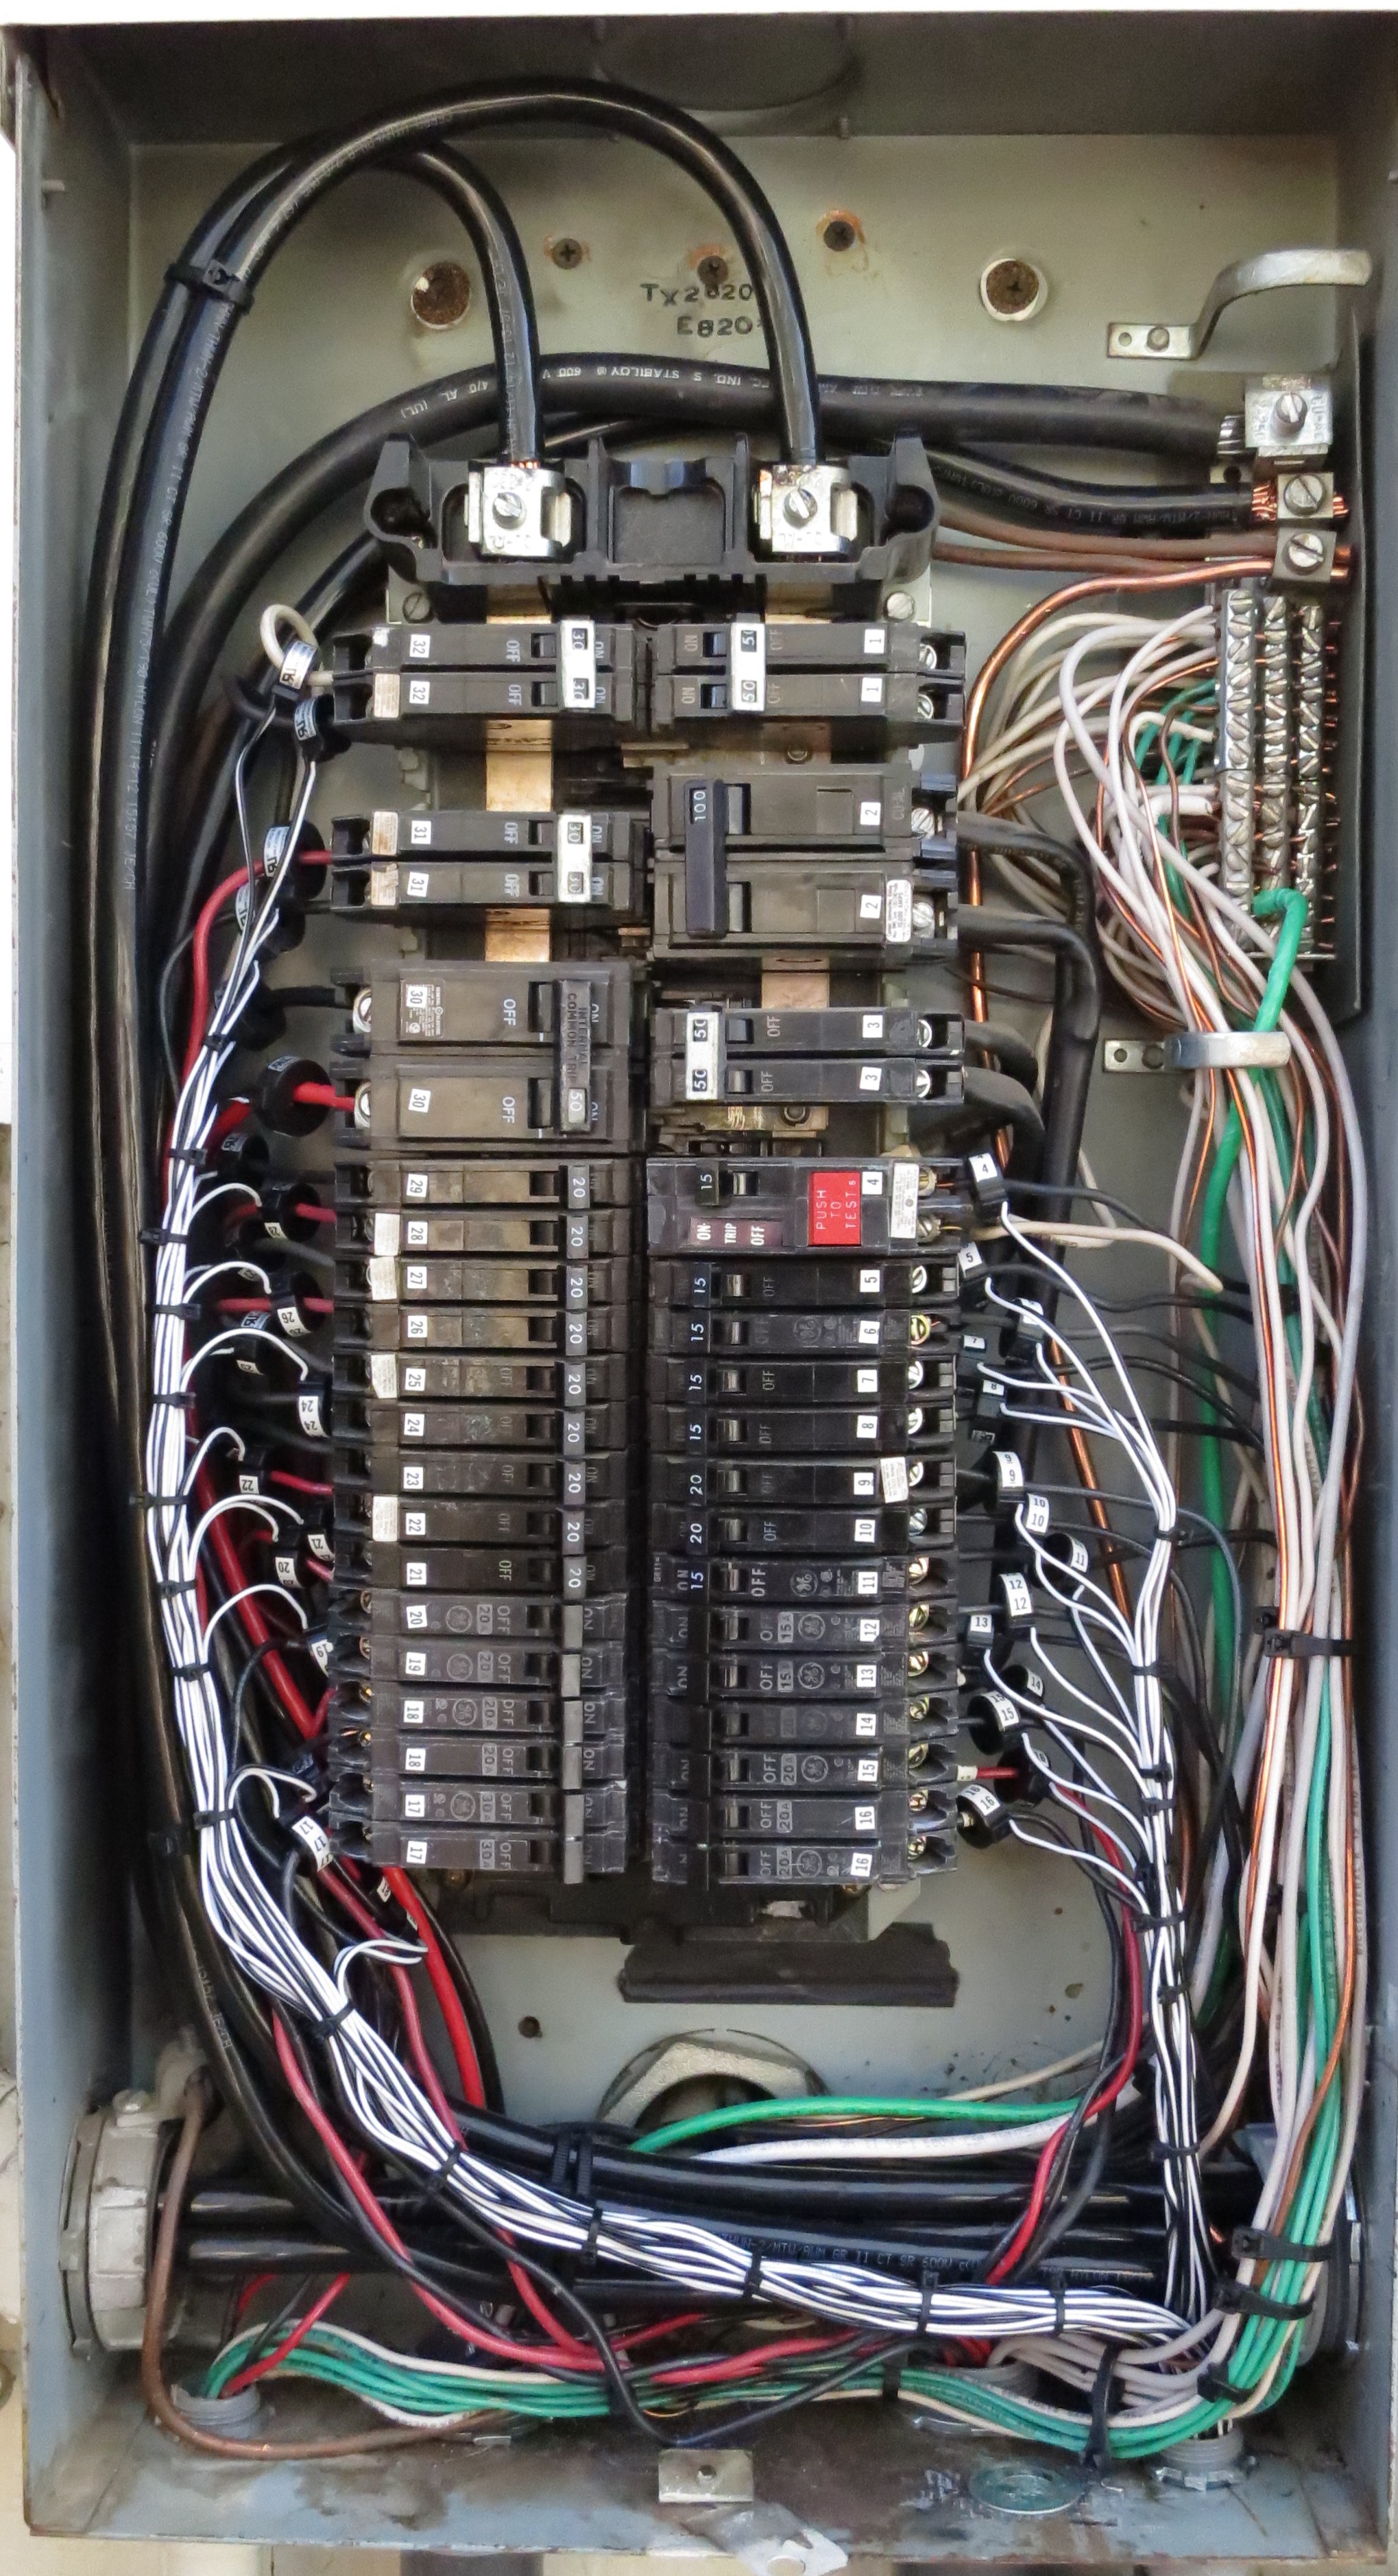
The generator transfer panel has three sets of CTs. One for the utility input, another for the generator’s output and a third for the supply to the generator. The supply to the generator powers the controls, battery charger, battery and engine heaters.

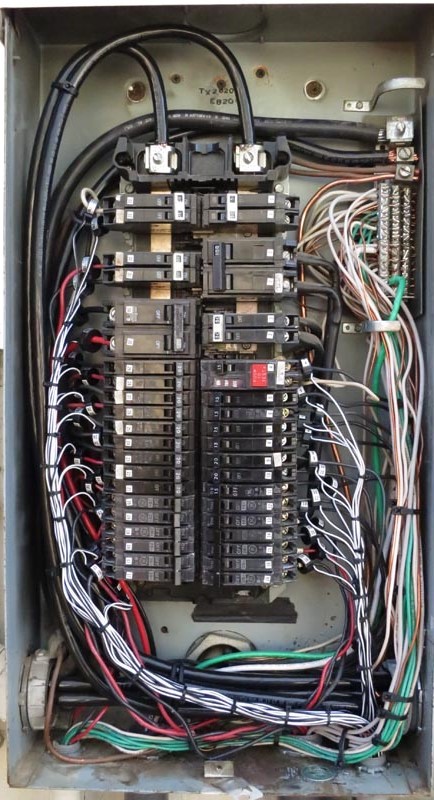
The breaker panel had the rest
Here is the GEM in place, there is a OneWire temperature probe inside the housing to monitor the internal temperature.
And the whole picture

Here are some screenshots of UltraJones’ excellent plug-in “UltraECM3” showing the graphing and load display pages.
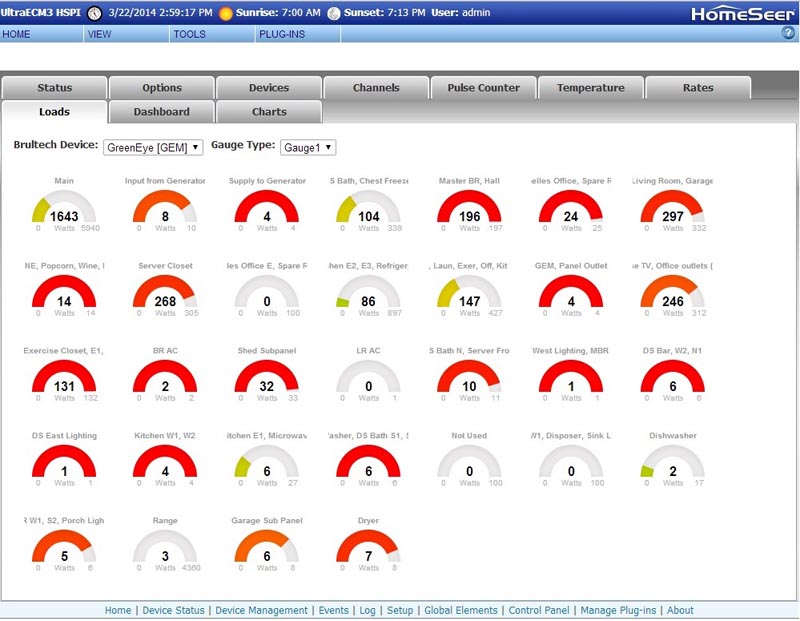
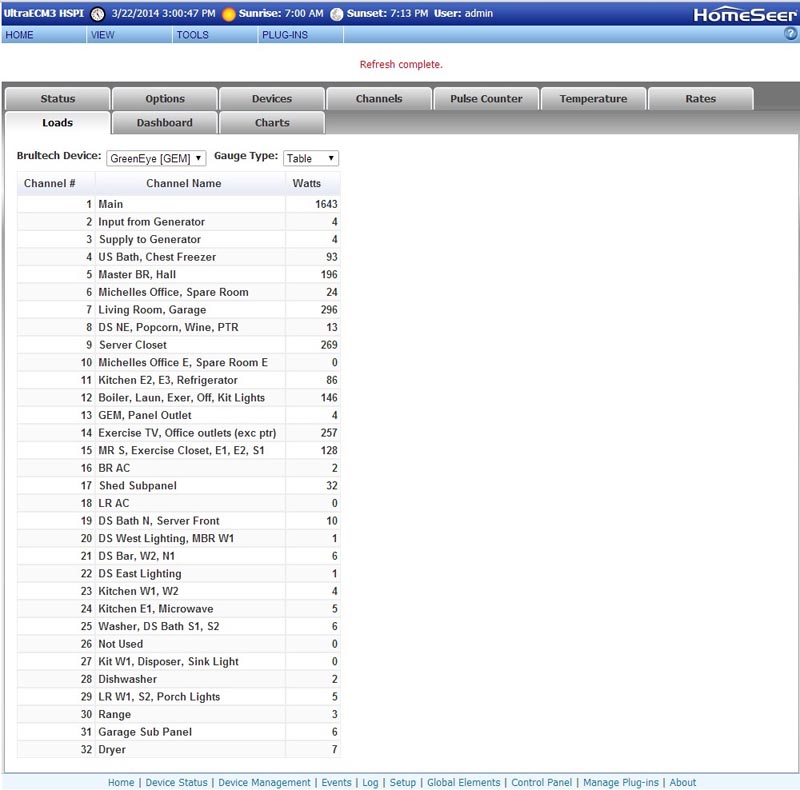
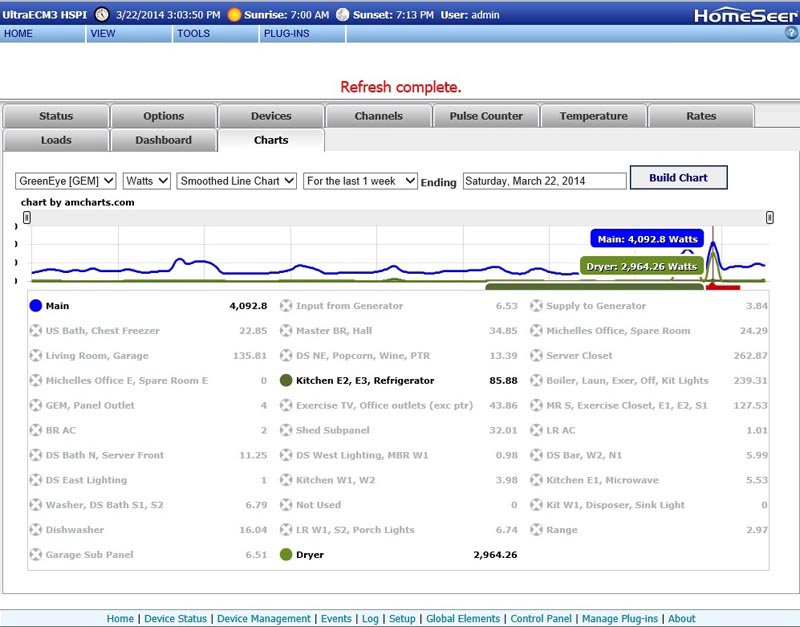
Note that these screenshots were taken today with the family upstairs watching TV (circuit 7) and me down at my large workstation (circuit 14) writing this document. You can also see that the HTPC in the master bedroom (circuit 5) is awake and active with me performing system and software updates. The table shows the added activity on all of those circuits. When all the equipment is off or asleep those circuits are generally under 20-watts. Only with the detail provided by the GEM can I see that kind of detail.
This took care of February
More to come….
PART 1:
I started learning about 70 days ago, installing a trial version of HS2 and quickly migrating to HS3 by the end of January. I felt like it would be a double learning curve to start with the older version. My brother has a great deal of experience with HomeSeer, so I relied upon his help to get me started. Like many users here I have had quite a bit of trouble getting up to speed. These troubles are mostly learning curve, but compounded slightly by the evolution of HS3, mostly the maturation of the Z-Wave plug-in. Like most software development it seems like two steps forward followed by one step back. Overall I give the HS team high marks for their continuing effort as the product is clearly better than the first version I loaded in January.
I have asked many (possibly inane) questions to this board and to my brother, but I am getting closer to understanding the nuances of the HS software and the Z-Wave network. Many thanks to The HomeSeer folks, my brother and many on this board. I have a long way to go, but I am getting there.
The primary goal of diving in was the “geek factor” as I am sure many of you are guilty. I did have some secondary goals of automating some tasks and most especially reducing our energy usage. I was realistic enough to understand that I would spend more on this approach than I would recover in energy savings, but I still wanted to pursue that goal. Last year I had installed a TED5000 with 4 transmitter modules. That was great at providing me a big picture of electric energy usage, but simply was not a granular as I wanted to really chase some of the smaller “vampire” loads.
Since HS3 supported the Brultech GEM through a plug-in from UltraJones, the first move I made was to that device from the TED. It allowed me to see every circuit in the house and make some changes in devices. We reduced our normal consumption by about 300 watts, so that we are at about an average of 650-watts when the house is more or less dormant. While that is still a lot, it is a vast improvement from the ~950 we were consuming before. This has been due to a replacement refrigerator, changes in the servers (HA, CCTV and Media), swaps to LED lighting for the devices that see more or less constant usage at night and isolation of about 100-watts of vampire loads from items that were only in use on occasion. We found that our two LG MiniSplit air conditioners consumed 30-50-watts each, even when they were off in the winter. They both went on Intermatic contactors to shut them down completely, unless it is warm enough for them to be used. Though they are heat pumps, we find that it is frequently too cold to use them for heat. We rely on a natural gas fired boiler hydronic system for heat. More about that in the next installment. There are a few other items that are now controlled by automation based upon time of day or outside temperature that also have dropped our total average consumption.. All totaled we have a net average reduction of 500-600 watts per hour. At about $.10 per KWH that will net a savings of over $500 per year. I’m sure I could have found the loads without the granularity of the Brultech GEM, but it was certainly easier with all of the data to instantly show what and where our consumption was. UltraJones UltraECM3 plug-in is a great value and a bargain at $39.95. The Brultech GEM is available from http://www.brultech.com. The prices vary based upon the configuration and communication methods. I chose wired Ethernet for my installation.
The GEM uses current transformers to measure the load carried by each circuit. Each transformer is inductively coupled to a single lead and converts current into voltage (or current, depending on the style). The output of each CT feeds one of 32 inputs on the GEM. A 120-volt circuit requires 1 CT, a 240-volt circuit with a balanced load can use one CT. If the circuit feeds an unbalanced load such as a sub-panel or devices that may present a different load to one phase of the 240-volt service than the other, two CTs are required. For consistency, I used two CTs for every 240-volt circuit. For these circuits the two CTs are wired out of phase to a single input of the GEM. The Range, Air Conditioners and Dryer are likely to be devices that only present a balanced 240-volt load, so it is unnecessary on these devices. The service entrance, breaker panel and generator transfer switch are all outside on the back of our house. The GEM comes in a case designed for indoor use, so I needed to come up with a solution. One would be to extend the leads on the current transformers by CAT5 cable and locate the GEM indoors. The problem with that is that the service entrance and panels are on the master bedroom wall and below that is a finished basement. That would mean burying the GEM behind a suspended ceiling or very long extensions on all 40 pairs of CT leads. I wasn’t sure how length would affect accuracy, so I elected to mount the GEM outside. I found a nice watertight enclosure to mount the GEM circuit board in. It also had a GFCI protected duplex outlet inside the box. It was not large enough to accommodate the GEM’s full enclosure, but it was large enough to handle the GEM PCB. A little creative trimming of the GEM chassis, made for a perfect fit. All I had to route into the house was Ethernet and a CAT5 cable for possible future use of the 8-device onewire temperature feature of the GEM. The GEM also has pulse counter inputs for potential water or gas consumption measurement. I am not going to use those features at this time.
You can click on any of the images below to see a full-size version.
The generator transfer panel has three sets of CTs. One for the utility input, another for the generator’s output and a third for the supply to the generator. The supply to the generator powers the controls, battery charger, battery and engine heaters.

The breaker panel had the rest
Here is the GEM in place, there is a OneWire temperature probe inside the housing to monitor the internal temperature.
And the whole picture
Here are some screenshots of UltraJones’ excellent plug-in “UltraECM3” showing the graphing and load display pages.
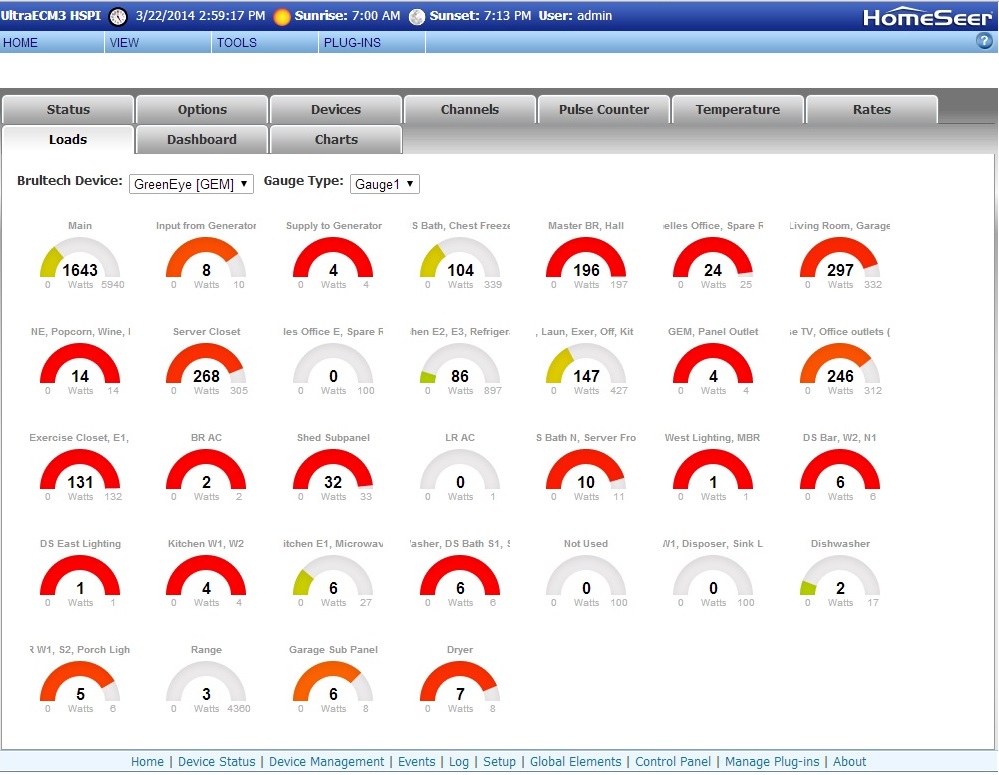

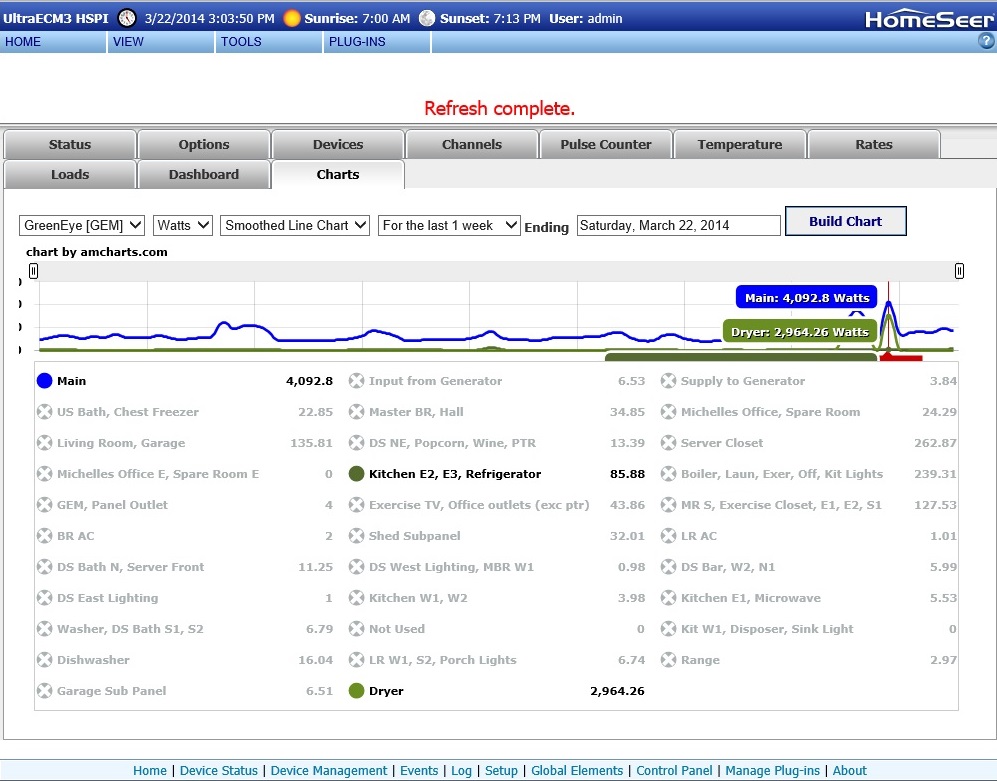
Note that these screenshots were taken today with the family upstairs watching TV (circuit 7) and me down at my large workstation (circuit 14) writing this document. You can also see that the HTPC in the master bedroom (circuit 5) is awake and active with me performing system and software updates. The table shows the added activity on all of those circuits. When all the equipment is off or asleep those circuits are generally under 20-watts. Only with the detail provided by the GEM can I see that kind of detail.
This took care of February
More to come….


Comment